Pesto Chicken Pita Pizza with Homemade Pesto
Easy pesto chicken pita pizza in 15 minutes! Homemade basil pesto, juicy chicken & melty mozzarella on a crispy pita crust.
Pesto Chicken Pita Pizza is one of those recipes that looks like you put in way more effort than you actually did and honestly, that’s exactly why I love it.
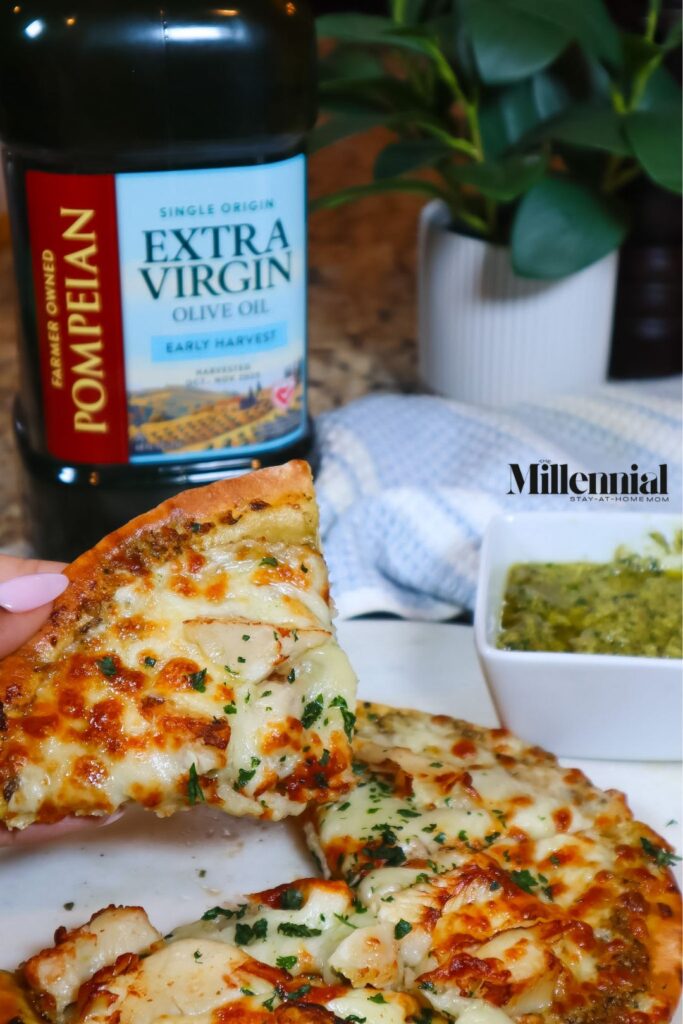
If you’ve been looking for a quick, fresh, and satisfying meal that the whole family will enjoy, this one is going to be your new go-to. We’re using pita bread as our pizza crust (one of my favorite healthy swaps!), loading it up with juicy chicken and melty mozzarella, and finishing it off with the most beautiful, vibrant homemade pesto you’ve ever tasted.
And yes, we are absolutely making the pesto from scratch. I know, I know. But stick with me, because homemade pesto is so much easier than it sounds, and the fresh flavor? There is simply no comparison to anything you’ll find in a jar at the store.
If you love easy, delicious meals like this one, be sure to check out my Hot Honey Chicken or my Cilantro Lime Chicken – two more easy weeknight winners that come together without a lot of fuss!
Why You’ll Love This Recipe
This Pesto Chicken Pita Pizza checks all the boxes. It’s quick, it’s fresh, it’s filling, and it feels a little fancy without requiring a lot of time or effort. Here’s why it works so well:
The pita crust gives you that perfectly crispy base without needing to make or buy pizza dough. It’s also a lighter swap that doesn’t sacrifice anything in the texture or flavor department.
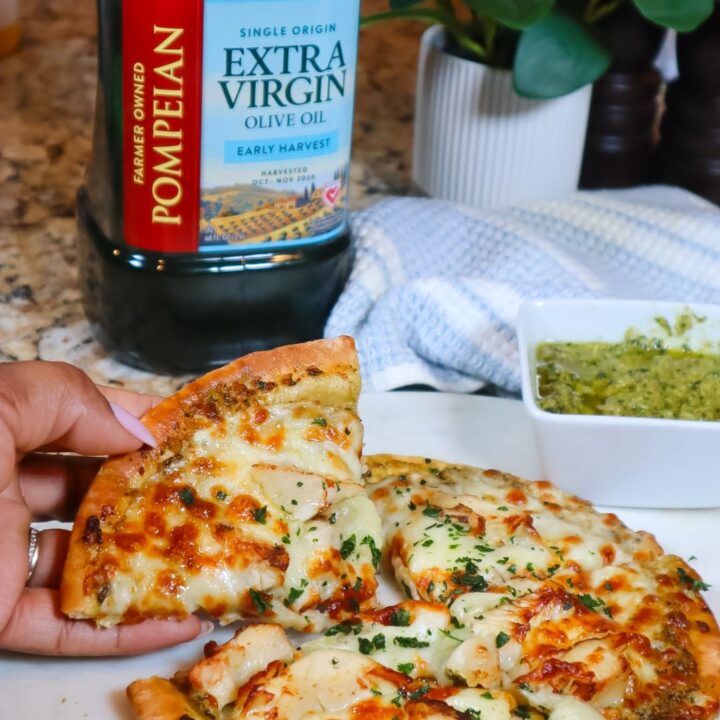
The homemade pesto is the real star of the show here. Made with fresh basil, toasted pine nuts, parmesan, garlic, lemon juice, and a really good extra virgin olive oil, it comes together in minutes in a food processor.
The air fryer does the heavy lifting when it comes to getting that golden, bubbly cheese. About 5 minutes at 400°F and you’ve got yourself a pizza that looks like it came from a restaurant!
Here’s What You Need To Make This Pesto Chicken Pita Pizza with Homemade Pesto
For the Homemade Pesto:
For the Pita Pizzas:
How to Make the Homemade Pesto
This is the easiest part, and it only takes a few minutes. Start by toasting your pine nuts in a skillet with a little bit of olive oil over medium heat, stirring frequently, until they’re lightly golden and fragrant. Keep a close eye on them because they can go from toasted to burned pretty quickly!
Once your pine nuts are toasted and slightly cooled, add them to a food processor along with the fresh basil, parmesan, garlic cloves, and fresh lemon juice. Pulse a few times to start breaking everything down.
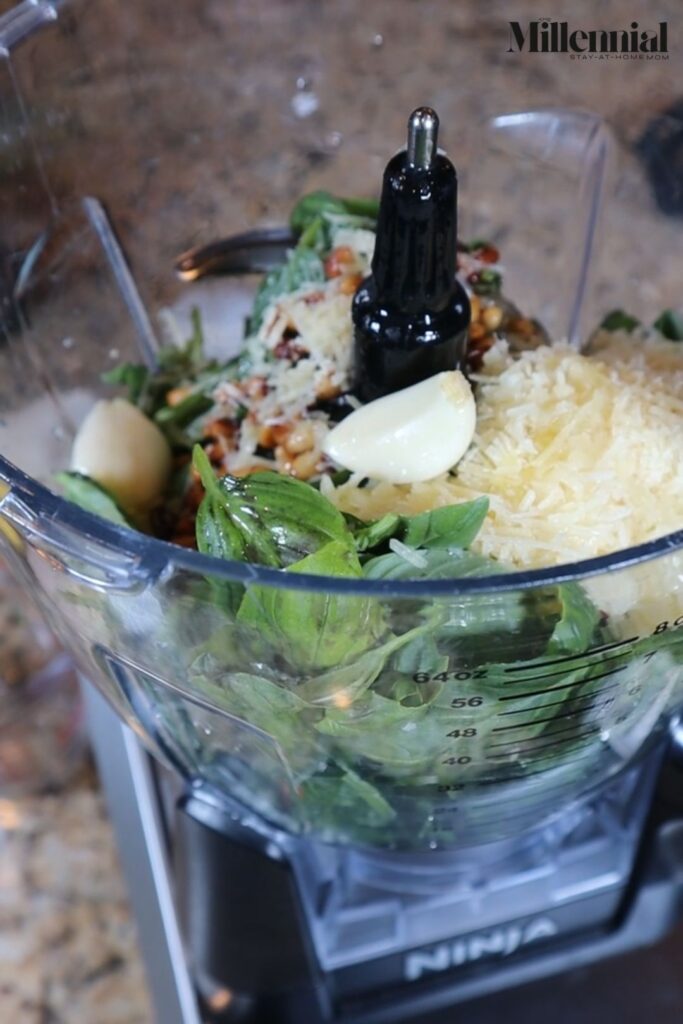
With the food processor running, slowly drizzle in the olive oil until everything comes together into a smooth, vibrant pesto. Season with salt and pepper to taste, then give it one final blend.
That’s it! Your homemade pesto is done. It will stay fresh in the fridge for 3 to 5 days in an airtight container, so it’s great to make ahead for easy meals throughout the week.

PRO-TIP
Toast your pine nuts before blending them into the pesto. It only takes a couple of extra minutes, but it deepens their flavor significantly and gives the pesto a richer, nuttier taste. Don’t skip this step!
How to Assemble and Cook the Pita Pizzas
Once your pesto is ready, assembling these pizzas couldn’t be easier. Lay your pita bread flat and spread a generous layer of homemade pesto over the surface, leaving just a small border around the edge. Top with your cooked chicken and an even layer of mozzarella. If you’re adding sundried tomatoes or thinly sliced red onion, this is the time to add those on top.
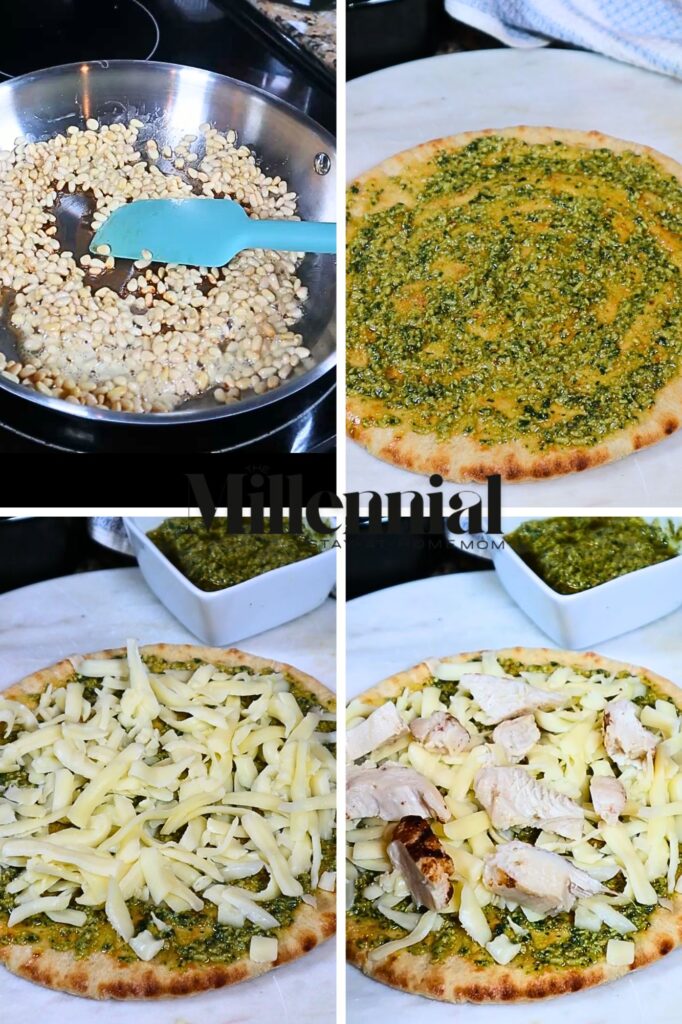
Place the assembled pita pizza in the air fryer basket and cook at 400°F for about 5 minutes, or until the cheese is melted, golden, and just starting to bubble. Keep an eye on it toward the end to make sure it’s melty and golden, not overdone.
Let it cool for just a minute before slicing and serving!
F.A.Q. & Storage Instructions
Can I use store-bought pesto instead of homemade?
You absolutely can use store-bought pesto, but I really encourage you to try the homemade version at least once. The freshness is on a completely different level, and since you’re only blending a handful of ingredients, it comes together in just a few minutes.
What kind of chicken works best?
Rotisserie chicken is my go-to for this recipe because it’s already cooked, already seasoned, and makes assembly incredibly easy. Grilled chicken or any leftover baked chicken also works beautifully here.
Can I make these in the oven instead of the air fryer?
Yes! If you don’t have an air fryer, place the assembled pita pizzas on a baking sheet and bake at 400°F for about 8 to 10 minutes, or until the cheese is melted and the edges of the pita are lightly crisp.
Can I make these ahead of time?
The pesto can absolutely be made ahead and stored in the fridge for up to 5 days. I’d recommend assembling and cooking the pizzas fresh, though since they only take a few minutes and taste best right out of the air fryer.
How should I store leftover pesto?
Store the pesto in an airtight container in the refrigerator for 3 to 5 days. To help it stay bright green, press a piece of plastic wrap directly against the surface of the pesto before sealing the container. You can also drizzle a thin layer of olive oil over the top to keep it fresh.
Can I freeze the homemade pesto?
Yes! Pesto freezes really well. Spoon it into an ice cube tray, freeze until solid, then transfer the cubes to a freezer bag. They’ll keep for up to 3 months and are perfect for pulling out whenever you need a quick meal!
This Pesto Chicken Pita Pizza is the kind of meal that earns a spot in your regular rotation. It’s fast enough for a busy weeknight, fresh enough to feel special, and flexible enough that you can swap in whatever toppings you have on hand. And once you make that homemade pesto, I promise you’ll find yourself putting it on absolutely everything.
Pesto Chicken Pita Pizza with Homemade Pesto
Quick, fresh, and full of flavor, these pesto chicken pita pizzas come together in just 15 minutes with a vibrant homemade pesto that makes all the difference.
Ingredients
Homemade Pesto
- 1/4 cup Pompeian Single Origin Early Harvest Extra Virgin Olive Oil
- 3 tbsp pine nuts, toasted
- 2 1/2 cups fresh basil, packed
- 1/4 cup parmesan, grated
- 2 garlic cloves
- 3 tbsp fresh lemon juice
- Salt, to taste
- Pepper, to taste
Pita Pizzas
- 2 to 4 pita breads
- 1 1/2 cups cooked chicken , shredded or sliced (use 1 cup for 2 pitas)
- 1 1/2 cups mozzarella cheese , (use one cup for 2 pitas)
- Sundried Tomatoes , optional
- Red Onion, optional
Instructions
For the Homemade Pesto:
1. Toast the pine nuts in a dry skillet over medium heat, stirring frequently, until lightly golden and fragrant. Set aside to cool slightly.
2. Add the toasted pine nuts, fresh basil, parmesan, garlic cloves, and lemon juice to a food processor. Pulse several times to begin breaking everything down.
3. With the food processor running, slowly drizzle in the olive oil until the pesto reaches a smooth consistency. Season with salt and pepper to taste and blend once more.
For the Pita Pizzas:
1. Spread a generous layer of homemade pesto over each pita bread.
2. Top with cooked chicken, mozzarella, and any optional toppings like sundried tomatoes or sliced red onion.
3. Air fry at 400°F for approximately 5 minutes, or until the cheese is melted and golden. Let cool for 1 minute before slicing and serving.
Notes
Leftover pesto can be stored in an airtight container in the refrigerator for 3 to 5 days, or frozen in an ice cube tray for up to 3 months.
Nutrition Information:
Yield: 4 Serving Size: 1Amount Per Serving: Calories: 340Total Fat: 23gSaturated Fat: 4gUnsaturated Fat: 19gCholesterol: 39mgSodium: 254mgCarbohydrates: 21gFiber: 1gSugar: 1gProtein: 16g
The writers and publishers of themillennialsahm.com are not nutritionists, registered dietitians, or medical professionals. You can learn more about our Nutritional Disclosure & Calculated Nutritional Disclaimer at https://www.themillennialsahm.com/disclosure-privacy-policy/